WP super cache plugin – How to install ?
How to WP Super Cache plugin installation?
Site speed is a major factor in search engine rankings.
After you install WordPress on your website, you should be interested to speed up your website.
That is why we try our best in WPBeginner to optimize the load speed at the site.
If that is what you do, you’ll notice that caching your site will improve your site’s speed and balance enormous traffic spikes.
W3 Total Cache is the best solution to enhance website performance.
So in this manual, we’ll show you how to install and install WP Super Cache correctly.
Note: W3 Total Cache and WP Super Cache are both great plugins, so, we strongly advise you to use one or the other according to your needs.
Install and enable the WP Super Cache plugin is first of all necessary.
When activated, WP Super Cache will inform you that your website currently does not enable caching.
WP Super Cache configuration
To activate cache, Go to “Settings”, then click on “WP Super Cache”.
Beneath the Easy tab, Turn on Cache and press “update status button”.
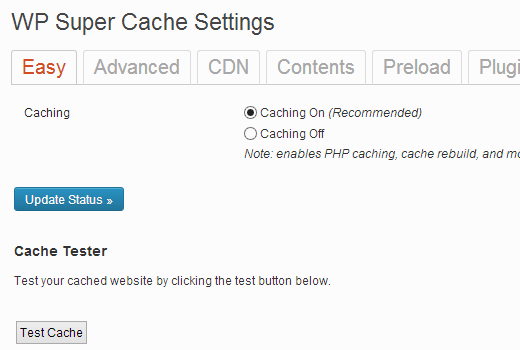
Once the cache is turned on, to check whether it works, click on the test cache.
WP Super Cache will twice collect your WordPress page and compare the two-page timestamps.
This implies that caching now works on your website if both timestamps match.
Advanced Setup of WP Super Cache
This plugin is very strong, and many advanced options are available.
These alternatives can enhance the efficiency of your site further.
To configure WP Super Cache with advanced functions, Select Settings, then click on WP Super Cache and choose Advanced.
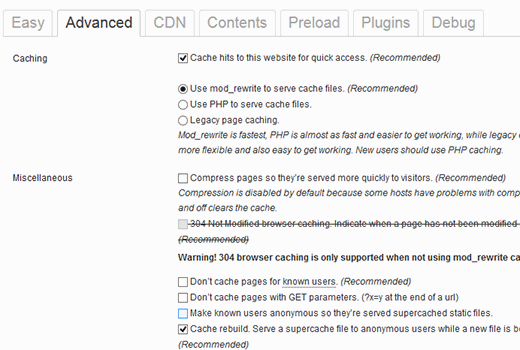
Activate cache
Check for fast access in the box that tells Cache to hit this website.
Three cache possibilities will be displayed below.
WP Super Cache utilizes PHP for serving cache files by default.
In particular in shared hosting settings, however, PHP can serve cache files resource intensively.
To save these configurations, scroll down and press the Status Update button.
Now WP Super Cache shows you that mod-rewrite rules have to be updated and another scheduling notification of garbage collection may be possible.
Scroll through the page, and you’ll see the rules of ‘mod-rewrite” to add.
This section will turn green once “mod rewrite” rules are updated.
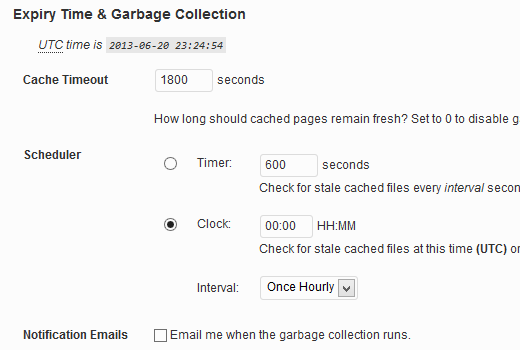
To resolve the notice about garbage collection, Scroll to Expiry Time & Garbage Collection on the sophisticated configuration page and Configure your server time and set up your server to collect cache-based file time and frequency for waste collection.
Note:
These files are downloading by user browsers quickly due to their smaller size.
Compression enabling,
Just visit the compress page box so visitors are serving faster.
WP Super Cache CDN configuration
On every page request, most content sites serve a lot of static files.
The following files are JavaScripts, images, stylesheets and so on.
In contrast to your WordPress messages that PHP generates dynamically,
The Content Delivery Network (CDN) can use to serve such files.
Installing WP Super Cache CDN, Select “CDN”, and Enable CDN Support option by checking the box next.
Enter the URL on your site, which is your pull zone’s URL.
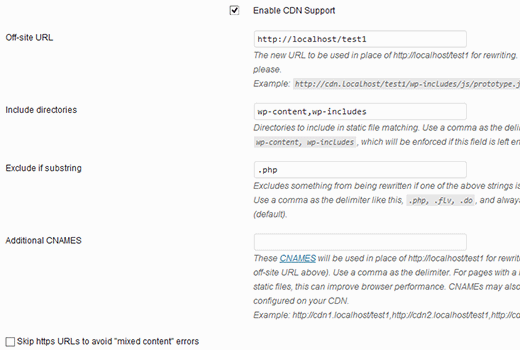
You join other CNAMEs for your pull area in the extra CNAME sector.
To prevent “blended content” mistakes, inspect the box which says Skip https URLs, and click on save changes.
You can now serve the static CDN content on your website.
Source from HERE