AMP on WordPress – 3 techniques to active it
In today’s fast-paced digital world, every second counts. Visitors expect a website to load instantly, and search engines reward speed with better rankings. That’s where AMP on WordPress (Accelerated Mobile Pages) comes in — a technology designed to create lightweight, super-fast versions of your web pages for mobile devices.
Google introduced AMP to improve user experience, especially on mobile search results. By implementing AMP on WordPress, you can enhance your site’s loading speed, improve SEO, and even boost your conversions. This is especially important in 2025, as Core Web Vitals and mobile usability continue to dominate the ranking factors.
If you’re serious about improving your website’s performance, this guide will walk you through three powerful techniques to activate AMP on WordPress, along with practical tips, plugin recommendations, and expert insights to help you get started smoothly.
For broader performance improvement ideas, you can explore this guide on website speed test tools in SEO — it’ll help you measure and analyze your site’s speed effectively before and after implementing AMP.
What Is AMP and How Does It Work?
Before diving into the technical part, let’s first understand what AMP really is and how it benefits your WordPress site.
AMP stands for Accelerated Mobile Pages, an open-source framework developed by Google. Its main purpose is to simplify the structure of your web pages by stripping away unnecessary scripts and optimizing HTML and CSS for lightning-fast performance.
When you activate AMP on WordPress, it generates a simplified version of your pages and posts. These AMP versions are cached and pre-loaded by Google, ensuring that when a mobile user clicks your link, the page appears almost instantly — often in less than a second.

Key Benefits of AMP on WordPress:
Faster load times for mobile users.
Higher SEO ranking potential due to improved Core Web Vitals.
Better mobile user experience, reducing bounce rates.
Increased visibility on Google News and mobile search results.
Enhanced ad viewability and engagement rates.
However, it’s worth noting that AMP isn’t suitable for every type of website. For blogs, news portals, and content-heavy sites, it’s a perfect match. But for complex e-commerce or dynamic web apps, AMP might limit certain functionalities.
To fully leverage AMP’s power, you must activate it using the right method — and that’s exactly what the next sections will cover.
Technique #1 – Activate AMP on WordPress Using the Official Plugin
The simplest and most reliable way to enable AMP on WordPress is by using the official AMP plugin developed by the WordPress community and Google.
Steps to Activate AMP:
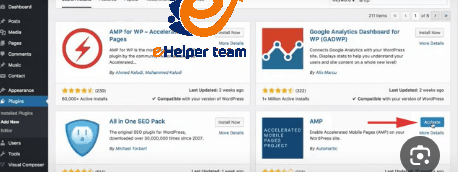
Go to your WordPress dashboard → Plugins → Add New.
Search for “AMP” and install the official plugin.
Once activated, navigate to AMP → Settings.
Choose your mode:
Standard Mode: Makes your entire website AMP-first.
Transitional Mode: Generates both AMP and non-AMP versions.
Reader Mode: Creates separate AMP versions for posts only.
Test your AMP pages by adding “/amp” at the end of a post URL.
Why Use the Official Plugin?
It’s lightweight, secure, and updated regularly.
Automatically validates your site for AMP compliance.
Compatible with popular themes and builders like Astra, Neve, and Elementor.
If you’re optimizing for performance beyond AMP, check out this related article on WordPress plugins for social media — integrating social sharing without slowing down your site is crucial for a balanced SEO strategy.
Pro Tip:
After installation, always validate your AMP pages using the Google AMP Test Tool. Fix any warnings to ensure maximum SEO value and smooth mobile performance.
Technique #2 – Using Third-Party Plugins Like AMP for WP
If you need more customization, the AMP for WP plugin offers advanced design control and compatibility features beyond the official AMP plugin.
How to Set It Up:
Install the AMP for WP plugin from your dashboard.
Go to AMP → Settings and configure design, analytics, and ad integration.
Use its drag-and-drop builder to style your AMP pages.
Connect your Google Analytics or Tag Manager for accurate tracking.
Unique Features:
Prebuilt templates for blogs and magazines.
AdSense and affiliate integration.
Advanced schema markup and SEO settings.
Compatibility with WooCommerce for AMP-enabled product pages.
Best Practice:
Avoid using both the official AMP plugin and AMP for WP at the same time — they can conflict. Choose one solution based on your needs and level of technical control.
To further test your AMP implementation, run diagnostics using the best website speed tools mentioned earlier — these will help you verify that your AMP pages are delivering measurable speed improvements.

Common Issues When Activating AMP on WordPress
Even though AMP simplifies mobile performance, users often encounter issues during setup. Knowing these common problems can save you time and prevent ranking drops.
1. Validation Errors
AMP pages must meet strict coding rules. Invalid HTML tags, external scripts, or excessive CSS can cause AMP pages to fail validation. Always use Google’s AMP Test or Chrome’s Developer Tools to fix these errors promptly.
2. Theme Compatibility
Some older WordPress themes use JavaScript-heavy designs that conflict with AMP restrictions. The solution is either switching to a lightweight theme like GeneratePress or using Transitional Mode in the AMP plugin.
3. Analytics & Ads Integration
AMP uses a special <amp-analytics> tag for tracking. Forgetting to implement it correctly means losing valuable insights. Similarly, ads must use <amp-ad> components, not traditional embed scripts.
4. Duplicated Content
Running both AMP and non-AMP versions without proper canonical tags can lead to duplicate content issues. Always specify:
in your AMP version to guide search engines.
5. Plugin Conflicts
Using multiple AMP-related plugins simultaneously can cause conflicts. Stick to one reliable plugin, and always back up your website before making major changes.
If your site still loads slowly, use advanced speed testing tools in SEO to pinpoint issues beyond AMP — such as image compression or hosting quality.
Best Practices to Maximize AMP Performance on WordPress
Activating AMP on WordPress is just the beginning. To fully benefit, you need to follow proven optimization strategies that maintain design integrity while ensuring top speed.
1. Optimize Images and Media
Use next-gen formats like WebP, and ensure all images use <amp-img> tags with specified width and height attributes. Lazy loading is built with AMP, which improves initial rendering times.
2. Use Structured Data
Add schema markup for articles, FAQs, and products. AMP pages with rich results stand out in Google search and attract higher CTR (Click-Through Rates).
3. Keep the Design Minimal
Avoid heavy JavaScript, complex animations, or multiple fonts. AMP works best with clean, minimalist designs that load instantly on mobile.
4. Regularly Validate and Update
Each time you edit content or install a new plugin, validate your AMP pages again. AMP’s strict standards ensure consistent, high-performance experiences.
5. Monitor User Behavior
Integrate Google Analytics for AMP to track user engagement, session duration, and bounce rates. Use these metrics to fine-tune performance continuously.
The SEO Impact of AMP on WordPress in 2025
Search engines have evolved, and so has AMP’s role in SEO. While it’s no longer a direct ranking factor, AMP on WordPress indirectly improves SEO through user experience, speed, and mobile optimization — all crucial for Core Web Vitals.
1. Faster Pages Mean Better Rankings
A page that loads in under two seconds is far more likely to retain users and reduce bounce rates. Google rewards these behavioral signals.
2. Improved Mobile Visibility
AMP pages often appear in Google’s “Top Stories” carousel, driving higher impressions and CTRs, especially for news and blog sites.
3. Higher Conversion Rates
Faster pages create smoother user journeys. Studies show that every 1-second delay can reduce conversions by up to 7%. AMP helps eliminate that risk.
By keeping your AMP pages well-structured, validated, and analytics-enabled, you’ll enjoy consistent organic growth and improved site health scores.

Frequently Asked Questions (FAQs)
1. What does AMP on WordPress do?
It creates fast-loading, mobile-optimized versions of your pages using the AMP framework developed by Google.
2. Is AMP still relevant in 2025?
Yes — even though it’s no longer mandatory, AMP continues to play a major role in mobile SEO and user experience.
3. Can I use AMP with WooCommerce?
Yes, using plugins like AMP for WP, you can enable AMP for product pages, though not all checkout functionalities are supported.
4. Does AMP affect my website’s design?
It simplifies your design for speed. However, advanced plugins let you customize the look while keeping AMP’s lightweight structure.
5. How can I test my AMP pages?
Use Google’s AMP Validator or the AMP Test Tool in Search Console to ensure your pages meet all technical standards.
6. Can I use ads on AMP pages?
Yes, but they must be implemented using <amp-ad> components rather than regular JavaScript ad scripts.
7. Will AMP increase my SEO ranking?
Indirectly — by improving page speed and Core Web Vitals, AMP contributes to better SEO performance and visibility.
8. How do I remove AMP from WordPress if needed?
Deactivate the AMP plugin and ensure proper redirects from AMP to standard URLs to avoid 404 errors or traffic loss.
9. Which is better: AMP for WP or the official AMP plugin?
If you want simplicity, use the official plugin. For customization and extra features, choose AMP for WP.
10. Is AMP suitable for all websites?
Not necessarily. It’s ideal for content-heavy sites like blogs or magazines, but may not fit highly interactive or dynamic websites.
Conclusion
In short, AMP on WordPress remains one of the best tools for boosting mobile performance and delivering instant-loading experiences. Whether you activate it using plugins or through manual coding, it directly enhances your Core Web Vitals and user satisfaction — key factors in modern SEO.
Before making your decision, consider your website’s structure and goals. If speed, readability, and mobile engagement are priorities, AMP is a powerful choice. However, for complex sites that rely heavily on dynamic scripts, consider hybrid solutions.


