only 3 minutes to install WordPress
If you’ve ever dreamed of launching your website or blog but feared the setup process, relax — you can install WordPress in just 3 minutes!
Yes, you read that right. Gone are the days of complicated coding, confusing servers, and endless steps. Modern hosting platforms make WordPress installation almost instant, even for complete beginners.
Fun fact: Over 43% of websites globally are powered by WordPress — making it the most popular CMS on the planet.
Before we dive into the process, let’s understand what WordPress is and why millions use it — it’s a great read for beginners.
Whether you’re starting a blog, building an online store, or creating a portfolio, mastering the quick installation process will save you hours of frustration. In this article, we’ll walk through the exact steps, hosting tips, mistakes to avoid, and expert tricks to ensure your WordPress installation runs smoothly from the start.
Can You Really Install WordPress in Just 3 Minutes? (Spoiler: Yes!)
Many beginners are skeptical when they hear you can install WordPress in three minutes. But thanks to modern hosting providers and automated tools, this is not only possible — it’s the standard today.
Here’s how it works:
Choose a hosting provider with a “One-Click Install” feature (like Bluehost, SiteGround, or Hostinger).
Register your domain name and connect it to your hosting account.
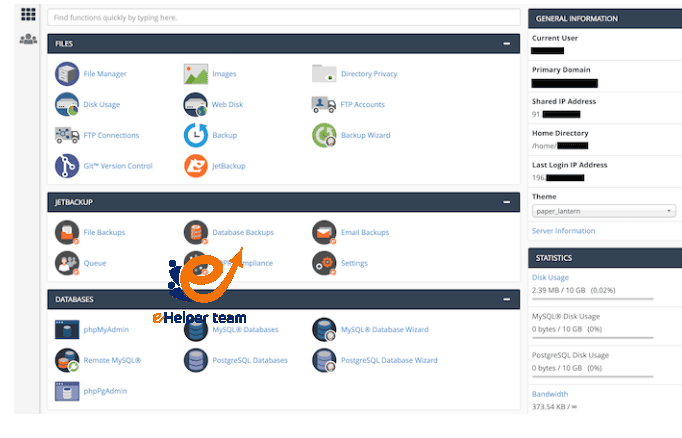
Click “Install WordPress” from your control panel (often cPanel or a custom dashboard).
Within minutes, your website’s backend (wp-admin) will be ready to use.
That’s it — your website is live.
No FTP uploads, no manual database setup, no confusion.
This fast installation is thanks to automation scripts like Softaculous or Fantastico, which handle all the backend configurations for you. Once installed, you can log in using your admin credentials and start designing your website instantly.
Pro Tip: Use the latest WordPress version and a secure password to avoid common vulnerabilities right from the start.
Step-by-Step Guide to Install WordPress Quickly
Let’s walk through the 3-minute process in detail. These are the steps that make your installation fast, secure, and beginner-friendly.
Step 1: Choose a Hosting Plan
Select a hosting service optimized for WordPress. For example, the Best WordPress hosting. Look for features like:
One-click WordPress installer
Free SSL certificate
Automatic updates
Daily backups
Step 2: Access Your Control Panel
Once your hosting account is active, log in to your control panel (usually cPanel). Find the WordPress Installer icon, typically under “Website” or “Applications.”
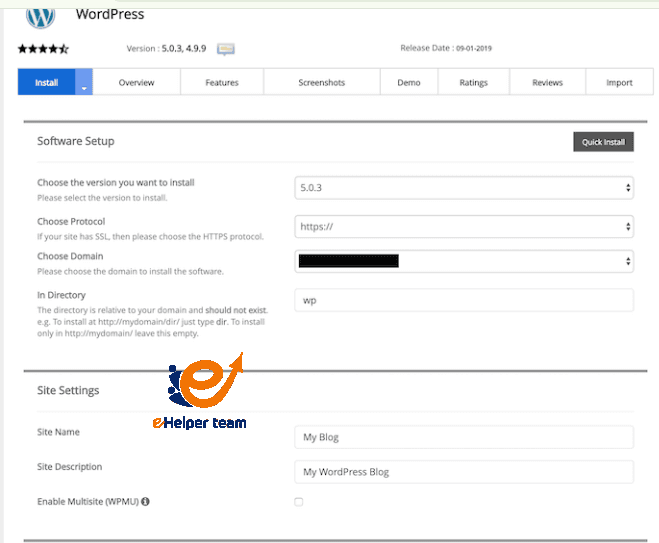
Step 3: Fill in the Installation Details
You’ll need to:
Choose your domain (the one you registered)
Set your site name and description
Create an admin username and password
Choose your preferred language
Click “Install Now”
The process takes less than three minutes to complete. Once done, you’ll see a confirmation screen with your WordPress login URL — usually yourdomain.com/wp-admin.
Step 4: Log in and Start Building
After installation, access your dashboard and begin customizing your site with themes and plugins.
If you’re unsure where to start, check out how to create a landing page in WordPress — it’s a great next step for beginners.

Choosing the Right Web Hosting for WordPress
Selecting the right web hosting provider is the most crucial step to ensure that you can truly install WordPress in under 3 minutes. Your hosting provider determines not just speed but also stability, uptime, and long-term performance.
There are several types of hosting suitable for WordPress, and each one offers distinct benefits:
Shared Hosting: Ideal for beginners because it’s affordable and easy to manage. However, it might slow down with heavy traffic.
Managed WordPress Hosting: Designed for professionals. It includes automatic updates, enhanced security, and specialized support.
VPS Hosting: Offers dedicated resources and higher speed, making it suitable for growing websites.
Cloud Hosting: Perfect for high-traffic or e-commerce sites due to its scalability and reliability.
When choosing a host, look for key features like:
One-click WordPress installation
SSD storage and free SSL certificates
Automatic backups and updates
24/7 technical support
WordPress caching and optimized servers
Pro tip: Choose a data center close to your main audience. This helps your site load faster and rank better in search results.

Setting Up Themes, Plugins, and Essential Configurations
Once you’ve successfully managed to install WordPress, the next step is to make your site look great and perform efficiently. This stage turns a blank website into something professional and engaging.
Choosing the Right Theme
Themes determine how your website appears to visitors. To install a theme:
Go to your WordPress dashboard.
Navigate to Appearance → Themes → Add New.
Choose a lightweight, mobile-friendly theme such as Astra, GeneratePress, or OceanWP.
Avoid overly complicated themes with too many built-in features — they often slow down your site.
Installing Essential Plugins
Plugins extend the functionality of your site. Here are some essential ones to start with:
Yoast SEO – Helps you optimize content for search engines.
WP Super Cache – Improves page loading speed.
Wordfence Security – Protects your site from malware and brute-force attacks.
Elementor – Lets you design pages visually without coding.
UpdraftPlus – Creates automatic backups to keep your data safe.
Configuring Basic Settings
Before you publish your first post, fine-tune your settings:
Set your site name, tagline, and timezone under Settings → General.
Go to Settings → Permalinks and choose the “Post Name” structure for SEO-friendly URLs.
Delete sample content like “Hello World” and the default sample page.
If you want to create a stylish homepage, you can read how to create a landing page in WordPress — a great guide for beginners on E Helper Team’s blog.
Common WordPress Installation Mistakes and How to Avoid Them
Although it’s simple to install WordPress, even small errors can lead to major issues later. Below are the most common mistakes and their solutions.
1. Installing WordPress in the Wrong Directory
If you install it in a subfolder like/wordpress, your site will appear as yourdomain.com/wordpress/ instead of yourdomain.com.
Fix: Always install WordPress on the root domain unless you intentionally need a subfolder.
2. Ignoring Security
Using “admin” as your username or weak passwords is a security risk.
Fix: Create a unique username and a strong password. Add a plugin like Wordfence for extra protection.
3. Skipping Updates
Outdated plugins or WordPress versions can lead to security holes.
Fix: Turn on automatic updates or update manually every week.
4. Forgetting SSL
Websites without HTTPS are marked as “Not Secure.”
Fix: Enable your free SSL certificate from your hosting dashboard.
5. Not Backing Up Your Site
Without regular backups, a single crash or hack can erase your entire site.
Fix: Use plugins like UpdraftPlus or Jetpack Backup to create scheduled backups.
Remember: preventing problems is always easier than fixing them after they happen.
Advanced Tips to Speed Up WordPress Setup and Performance
After you install WordPress and configure your basic settings, it’s time to optimize your site for speed and long-term performance. Fast-loading websites provide a better user experience and help you rank higher on Google.
Here are some expert tips:
Use a lightweight theme. Minimal designs load faster and make your site more responsive.
Limit your plugins. Install only essential ones — too many plugins slow down performance.
Enable caching. Use plugins like W3 Total Cache or WP Rocket to load pages faster.
Optimize images. Compress images before uploading using TinyPNG or the Smush plugin.
Use a CDN. Content Delivery Networks like Cloudflare distribute your site’s files globally for faster access.
Test performance regularly. Tools like GTmetrix and Google PageSpeed Insights help identify slow elements.
Following these tips ensures your site not only installs quickly but also stays fast and secure.

Frequently Asked Questions About Installing WordPress
Can I install WordPress without any technical skills?
Yes, modern hosting platforms offer one-click installations that don’t require coding knowledge.
2. How long does it really take to install WordPress?
With one-click installation, it takes less than 3 minutes. A manual setup may take up to 15 minutes.
Is WordPress free?
Yes, WordPress is completely free, but you’ll need to pay for a domain name and hosting.Which hosting is best for beginners?
Shared WordPress hosting from companies like Bluehost or Hostinger is ideal for beginners.Can I install WordPress on my computer?
Yes, using software like XAMPP or LocalWP, you can install it locally for testing and development.What happens after installation?
You can log in to your dashboard, install a theme, add plugins, and start creating content.Do I have to update WordPress manually?
Not always. Many hosts provide automatic updates, and you can also enable this feature in your dashboard.Can I migrate my site to another host later?
Yes, plugins like All-in-One WP Migration or Duplicator make migration simple.Is WordPress secure after installation?
It is secure as long as you follow best practices — use strong passwords, enable SSL, and keep everything updated.How can I improve my site’s speed after installation?
Use caching plugins, compress your images, and choose a host optimized for WordPress performance.
Final Thoughts
Installing WordPress in just 3 minutes is no longer a dream — it’s a reality. Thanks to modern technology, anyone can create a professional website without technical experience.
By selecting reliable hosting, avoiding common mistakes, and optimizing your site for speed and security, you’ll ensure your WordPress website runs smoothly and attracts more visitors.
For further WordPress tutorials and hosting recommendations, visit E Helper Team’s official blog, which is full of beginner-friendly guides and expert resources.


