How to create Payoneer account step by step
Opening a Payoneer account in 2025 is one of the smartest decisions for freelancers, online sellers, and digital entrepreneurs. It allows you to send and receive international payments quickly and securely. Whether you’re getting paid by clients, marketplaces like Upwork or Fiverr, or e-commerce platforms such as Amazon, Payoneer provides an easy global payment solution.
To understand more about how Payoneer bank works and its international services, check this Payoneer bank overview. It explains the platform’s background and how it supports millions of users worldwide.

Why You Should Create a Payoneer Account in 2025
In 2025, the demand for global payment systems continues to grow — and a Payoneer account remains a trusted choice for professionals who need to move money internationally. Payoneer lets users receive funds in multiple currencies, withdraw to local banks, and pay service providers easily.
Key Benefits
Global reach: Receive payments from more than 200 countries.
Multi-currency support: USD, EUR, GBP, and more.
Low fees: Pay less than traditional bank transfers.
Marketplace integration: Works with Amazon, Fiverr, and Upwork.
Security: Protected by two-step verification and encryption.
With such flexibility, a Payoneer account is the go-to financial tool for anyone working online in 2025.
Step-by-Step: How to Create a Payoneer Account
Here’s the complete process to register your Payoneer account successfully.
Step 1: Visit the Official Payoneer Website
Go to Payoneer registration and click “Sign Up & Earn $25.” Always make sure you’re on the verified domain.
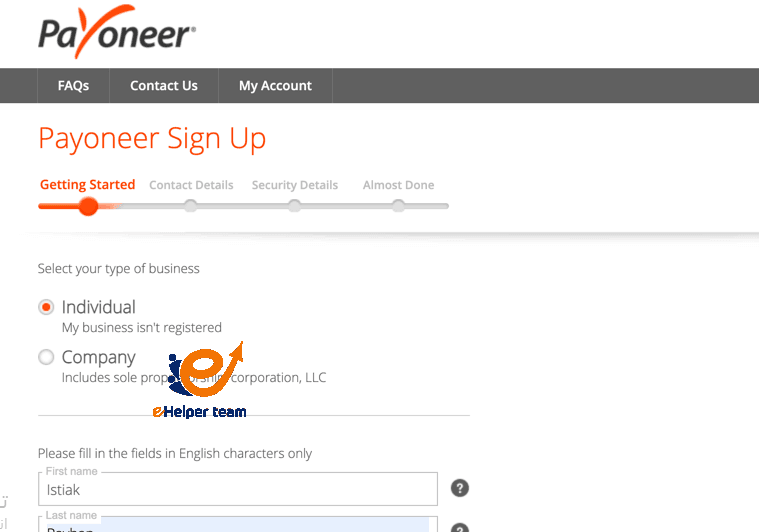
Step 2: Select Account Type
Choose between:
Individual Account: Ideal for freelancers or personal use.
Business Account: For registered companies and e-commerce sellers.
Step 3: Enter Personal Details
Provide your full name (as per your ID), date of birth, and email address. Choose a strong password.
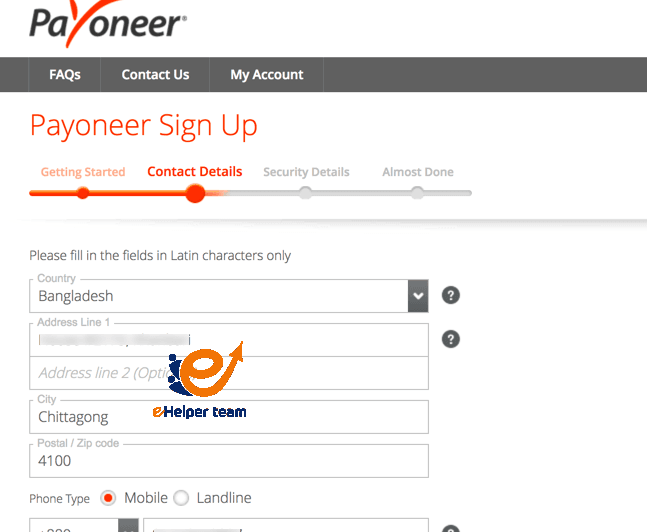
Step 4: Add Contact Details
Enter your country, address, and phone number. Payoneer will send you a verification code by SMS.
Step 5: Add Bank Details
You’ll need to link your local bank account to receive withdrawals. Ensure names match exactly.
Step 6: Verify Your Identity
Upload your passport, ID card, or driver’s license. The verification process usually takes 1–3 business days.
You can read a full breakdown of the sign-up process in this guide about Payoneer registration steps — it includes visuals and details on how to request your Payoneer card.
Once approved, you can start using your account to receive funds immediately.
Understanding the Payoneer Dashboard
Once your Payoneer account is activated, you’ll gain access to the dashboard — the hub for managing all your transactions, currencies, and cards.
Dashboard Features
Home: View balances and recent transactions.
Receive: Find your virtual bank accounts (USD, EUR, GBP).
Pay: Send money to others or pay for services.
Withdraw: Move funds to your linked bank accounts.
Reports & Settings: Manage preferences, notifications, and security.
To explore how Payoneer works in detail, check this detailed resource on the Payoneer account guide, which explains fees, eligibility, and how to maximize your benefits.
How to Order and Activate Your Payoneer Card
The Payoneer card is one of the most useful features — a prepaid MasterCard that allows you to withdraw money from ATMs, pay online, or use it for shopping anywhere MasterCard is accepted.
How to Get and Activate
Request your card after your account has received at least $100.
Wait for delivery — usually within 2–4 weeks.
Activate it online through your dashboard.
Start using it worldwide instantly.
To understand how to add funds and manage your balance, read this detailed post about charging your Payoneer account. It explains how to top up and use your funds effectively.
Common Mistakes to Avoid
Avoiding common errors ensures your Payoneer account runs smoothly and doesn’t get flagged during verification. Here’s what to watch for:
Using a nickname instead of your legal name.
Entering mismatched bank details.
Uploading expired or unclear ID photos.
Registering multiple accounts with one identity.
Ignoring verification emails from Payoneer.
Always double-check every field before submission. A few extra seconds can save you days of delay.
Quick Recap: Why Payoneer Is the Best Option
To sum it up, a Payoneer account gives you:
Easy cross-border transactions
Quick transfers to your local bank
Secure, compliant global payments
A convenient prepaid card
24/7 online access
In 2025, Payoneer remains one of the top global payment platforms trusted by freelancers, remote employees, and international businesses.
Managing Your Payoneer Account Effectively
Once your Payoneer account is verified and active, managing it properly is the key to getting the most out of the platform. Whether you are a freelancer, e-commerce seller, or business owner, understanding how to navigate your account ensures smooth transactions and minimal fees.
Tips for Managing Your Payoneer Account
Keep your details updated: Always make sure your bank information and address are correct to avoid transfer issues.
Monitor transactions regularly: Check your dashboard for any unauthorized activity.
Use notifications: Enable email and SMS alerts for incoming payments or withdrawals.
Use multiple currencies wisely: If you receive in USD and withdraw in another currency, monitor exchange rates before transferring.
Leverage global payment service: With your virtual accounts, you can receive payments as if you have a local bank account in multiple countries.
Understanding these features will help you use your Payoneer account more efficiently and take full advantage of its global capabilities.
Payoneer vs PayPal: Which One Is Better in 2025?
When it comes to global online payments, both Payoneer and PayPal are top names. However, depending on your needs, one platform may be more beneficial than the other.
Payoneer Advantages
Lower withdrawal fees
Supports multiple currencies
Better suited for freelancers and marketplaces
Offers a physical MasterCard for easy withdrawals
PayPal Advantages
Widely accepted by online stores
Instant payments between PayPal users
Strong buyer protection for online purchases
If your focus is receiving payments from clients or freelance platforms, a Payoneer account is often the better option due to lower costs and global reach.
For personal online shopping and fast transfers between individuals, PayPal remains convenient.
To learn more about their comparison, check this guide on Payoneer vs PayPal.
Understanding Payoneer Fees and Limits
One of the most important things to know about your Payoneer account is the fee structure. While Payoneer is generally affordable, being aware of fees helps you plan your transactions better.
Common Payoneer Fees
Receiving payments: Free for payments from other Payoneer users.
Bank withdrawals: Around 2% above the market exchange rate.
ATM withdrawals (Payoneer card): A small flat fee per transaction.
Card maintenance: Around $29.95 per year for the prepaid MasterCard.
Despite these charges, a Payoneer account remains cost-effective for freelancers and small businesses when compared with traditional international bank transfers.
Security Tips for Your Payoneer Account
Since you’re handling financial transactions, protecting your Payoneer account should be a top priority. Cybersecurity threats are increasing, and taking a few preventive measures can save you a lot of trouble.
How to Keep Your Account Safe
Enable two-step verification for all logins.
Use a strong, unique password and update it regularly.
Avoid public Wi-Fi when accessing your account.
Never share your credentials with anyone.
Report suspicious activity immediately through the support center.
By following these steps, your Payoneer account will stay secure and reliable for everyday business use.

Frequently Asked Questions (FAQs)
1. Is Payoneer free to use?
Yes, creating a Payoneer account is completely free. You may only pay small transaction or withdrawal fees depending on your activity.
2. How long does it take to verify a new Payoneer account?
Verification usually takes between 24–72 hours after you upload valid identification documents.
3. Can I use my Payoneer account without a bank account?
Yes, you can still receive and hold funds in your Payoneer account, but you’ll need a bank account to withdraw them.
4. How do I get my Payoneer card?
Once your account receives at least $100 in payments, you can request the Payoneer card through your dashboard.
5. What currencies does Payoneer support?
Payoneer supports major currencies including USD, EUR, GBP, AUD, CAD, and more.
6. Can I link my Payoneer account to Fiverr or Upwork?
Yes. Payoneer is directly integrated with Fiverr, Upwork, Amazon, and other global platforms.
7. What should I do if my Payoneer account is not approved?
Double-check your submitted information, ensure your ID is valid, and contact Payoneer customer support for clarification.
8. Are there any Payoneer account limits?
Yes. Limits depend on your account type, verification status, and transaction history. You can view them in your account settings.
9. Can I have multiple Payoneer accounts?
No. Payoneer only allows one active account per person or business entity.
10. How can I contact Payoneer support?
You can reach them through live chat, support tickets, or the help center on the official website.
Conclusion
A Payoneer account is more than just a payment tool—it’s a gateway to global opportunities. In 2025, with the growth of remote work, freelancing, and e-commerce, having a reliable and secure payment system is crucial. Payoneer delivers exactly that.
By following the step-by-step guide above, you can create your Payoneer account, verify it, and begin managing payments across borders seamlessly. With its low fees, multiple currency support, and excellent security features, Payoneer continues to be one of the best financial platforms for professionals around the world.


