How to adjust Woocommerce settings in your store
you must know the following points to adjust Woocommerce settings in your store after you finished building WordPress and WooCommerce on your store.
Adjust Woocommerce settings in your store
Adjust Woocommerce settings in your store by building the key shop pages
In short, online stores are a specific type of website, and to function properly, they need certain specific pages.
This page for you is the first step in the WooCommerce Wizard:
A- Shop: that’s where the items will be shown.
B- Cart: This is a shopping cart that helps the customers before check-out to place their order.
C- Checkout: This is where consumers choose the form of shipment and distribution and pay for anything they ordered.
D- My Account: a form of a registered customer profile page.
(they can show their past orders and handle additional details)
You only need to press the Continue button at this point in the WooCommerce wizard.
The pages are built for you by WooCommerce.
Set up Locale
In short, the locale is an important part of your business.
These parameters define the source, currency and preferred items of your business.

Tap “Continue” when you’re done.
Comprise Sales Tax
In short, tax is by far the worst aspect to run an e-competition shop, yet, unfortunately, it’s something too that we can’t ignore.
You will be pleased to see that this part is also beneficial to WordPress Woocommerce.
First of all, you can choose whether or not to ship physical goods.
When you check the box, the rest of the shipping information in the settings are pre-set.

Charge next! WooCommerce has a very good application for a charge, it allows you to determine tax rates based on your position at the store.
You only have to check the principal tax box if you charge a sales tax.
As soon as you do, you’ll get a new set of boxes and tell you what’s next.
Tap “Continue”.
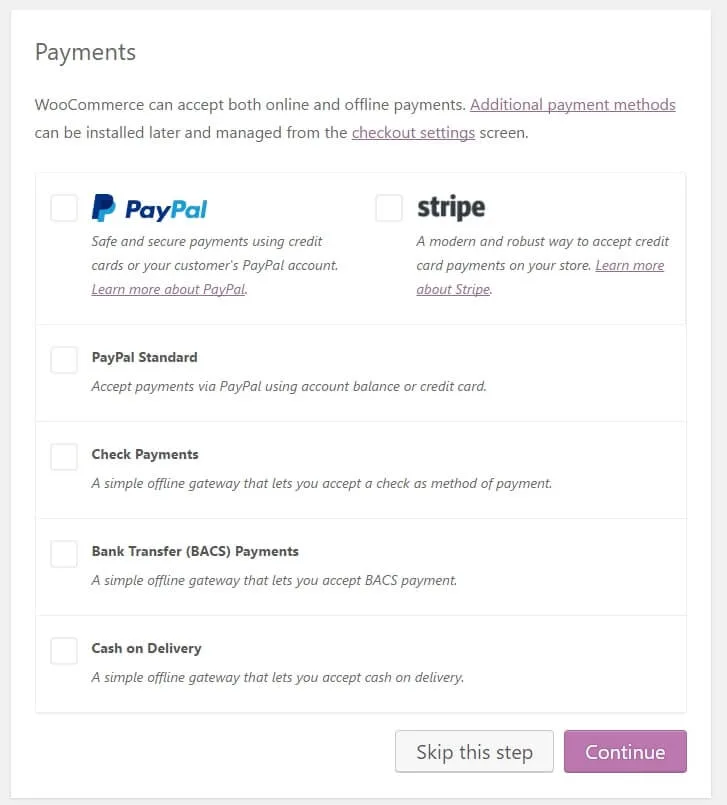
Choose a method of payment (PayPal is advisable)
In short, the centre of any e-commerce store is being allowed to accept online payments, about the available options, WooCommerce offers a lot.
Here are the choices you should make:

Two of the most popular options for payment are at the top, Stripe and PayPal, the integration of both of your pages highly recommended.
Tap on the checkboxes you like.
You can also choose other methods of payment that seem important.
Later in your WooCommerce settings panel, there will be even more options available.
Once, when done, press “Continue.”
The next step is only a confirmation screen that all went well.
Your basic site setup now completed.
With WooCommerce you have just created a blank e-commerce shop!
The next step is product addition.


